User Manual for Engine Air Filter Replacement (Prius 2020 Model)
1. Introduction
This manual provides step-by-step instructions for replacing the engine air filter of a Toyota Prius (2020 Model). This procedure can be completed in approximately 5–10 minutes.
2. Specifications
| Specification | Detail |
|---|---|
Vehicle | 2020 Toyota Prius (XLE, LE, L Eco, Limited) |
Engine | 1.8L 4-Cylinder (2ZR-FXE) |
OEM Part Number | 17801-37021 |
Filter Type | Dry panel air filter |
Replacement Interval | Every 30,000 miles or 36 months |
Compatible Brands | Toyota Genuine, Fram CA10176, K&N 33-2304 |
3. Tools & Materials Required
You will need the following before beginning:
New replacement air filter (see specifications above)
Flathead screwdriver (optional, for stubborn clips)
Clean cloth or paper towels
Flashlight (if working in dark conditions)
Note | No special tools are required. The air filter housing uses quick-release clips that can be opened by hand. |
4. Safety Precautions
Always perform this procedure with the engine off.
Before beginning, make sure that the hood is cool to touch.
Ensure that the vehicle is parked on a flat, stable surface with the parking brake engaged.
5. Step-by-Step Replacement Procedure
5.1 Prepare the Vehicle
Turn off the ignition and remove the key.
Open the hood by pulling the hood release lever located under the dashboard on the driver’s side.
Secure the hood with the hood prop rod.
Allow the engine to cool for at least 15 minutes if it was recently running.
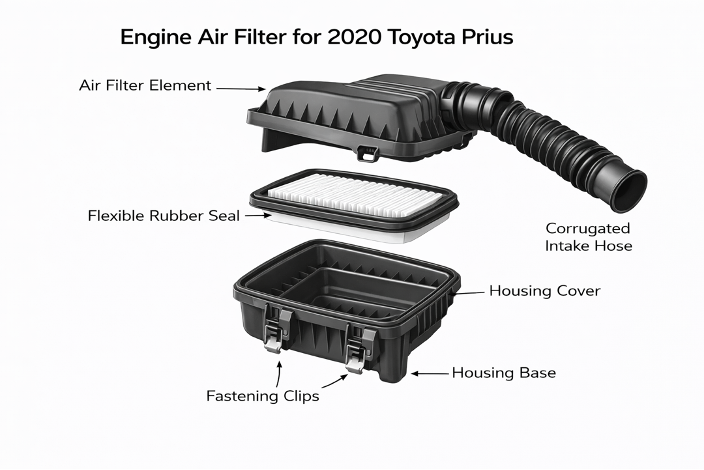
5.2 Find the Air Filter Housing
The air filter housing is a large black rectangular box located at the front on the passenger side (right side when facing the engine from the front).
Identify the black-colored corrugated intake hose (shown in Fig. 1) connected to the housing on one side.
Locate the four metal fastening clips that secure the top cover of the housing.
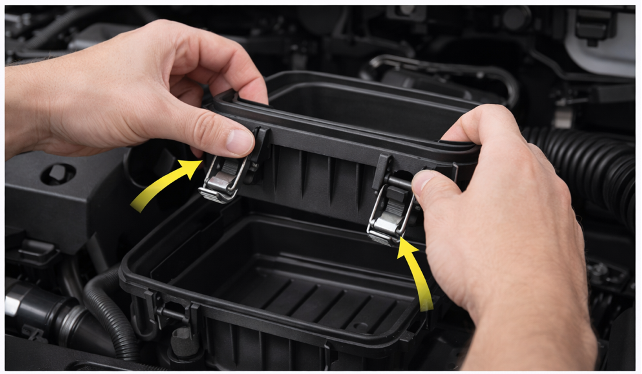
5.3 Open the Air Filter Housing
Using your fingers (or a flathead screwdriver, if needed), unclip all four fastening clips by pressing them outward (shown in Fig. 2).
Carefully lift the top cover of the housing. It does not need to be fully detached. Tilt it back to access the filter.
Note | Observe the orientation of the existing filter before removing it. |
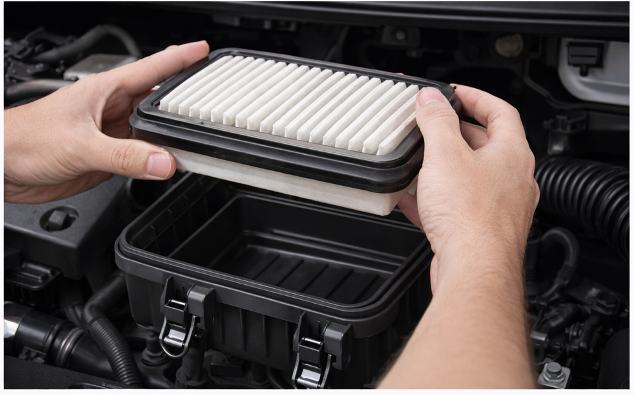
5.4 Remove the Old Air Filter
Lift the old air filter straight up and out of the housing (as shown in Fig. 3).
Use a clean cloth to wipe out any dust or debris from inside the housing.
Warning | Do not use compressed air near the intake opening for cleaning dust. |
5.5 Install the New Air Filter
Remove the new filter from its packaging and inspect it for damage.
Place the new filter into the housing with the flat side facing down and the rubber gasket seated firmly against the housing edges.
Ensure all four corners of the filter are flush and no gaps are present around the edges.